Visual Studio Code Editor
This extension pack includes tools for developing on the Salesforce platform in the light weight, extensible VS Code editor. These tools provide features for working with development orgs (scratch orgs, sandboxes and DE orgs), Apex, Aura components, Visualforce and Lightning Web Components.
VS Code is a Product of Microsoft. It is a light weight, modern and free IDE.
Supporting Platforms: Linux, Windows and Mac
Development
- Code completion for standard library, Custom objects and methods and property completion.
- Beautiful looking SQL Queries with syntax highlighting.
- Grammar improvements to provide better error checking.
- Discover and easily fix errors and deprecated CSS classes in your Lightning Components.
JavaScript & CSS
- Syntax highlighting
- Snippets
- Refactoring
- Code Formatting
- Etc…
Replay Debugger

Debug with logs
- Simulate a live debugging session using a debug log, which is a recording of all interaction in a transaction.
- We can view and download the logs from VS Code with syntax highlighting.

Testing
- Inline Test runner
- Run Apex test for classes or methods right from the code editor

Test Browser
- View and run all test in your project.
- Able to see the status of the last test run for each test class and method.

Running VS Code on Windows
- Download the Visual Studio Code installer for Windows.
- Once it is downloaded, run the installer (VSCodeUserSetup-{version}.exe). This will only take a minute.
- By default, VS Code is installed
under C:\users\{username}\AppData\Local\Programs\Microsoft VS Code.
Note: If you are getting error related to Java, make sure to explicitly set Java variable in VS code setting or add JAVA_HOME variable to your “Environment Variables” pointing to the jdk folder.
Salesforce Extensions for Visual Studio Code
Before you set up Salesforce Extensions for VS Code, make sure that you have these essentials.
Salesforce CLI
Before you use Salesforce Extensions for VS Code Salesforce CLI
Salesforce CLI is used to execute commands against Salesforce orgs and work with source files on your local machine. Salesforce Extensions for VS Code uses Salesforce CLI behind the scenes, so even if you don’t want to use the CLI directly you need to install it on your machine.
After you’ve installed Salesforce Extensions for VS Code’s dependencies, install the Salesforce Extension Pack extension from the Visual Studio Marketplace. The extension pack contains everything you need to develop Salesforce apps using Visual Studio Code.
This extension pack includes tools for developing on the Salesforce platform in the lightweight, extensible VS Code editor. These tools provide features for working with development orgs (scratch orgs, sandboxes and DE orgs), Apex, Aura components and Visualforce.

After Installation of Salesforce Extension Pack
Creating a Project
There are two types of developer processes or models supported in Salesforce Extensions for VS Code.
- Org Development Model
- Package Development Model
Org Development Model:
The org development model allows you to connect directly to your sandbox, Developer Edition (DE) org, Trailhead Playground, or even a production org to retrieve and deploy code directly. This model is similar to the type of development you have done in the past using tools such as Force.com IDE or MavensMate.
When you employ the org development model, you track your changes manually and deploy sets of changes to sandboxes and then to your production org.
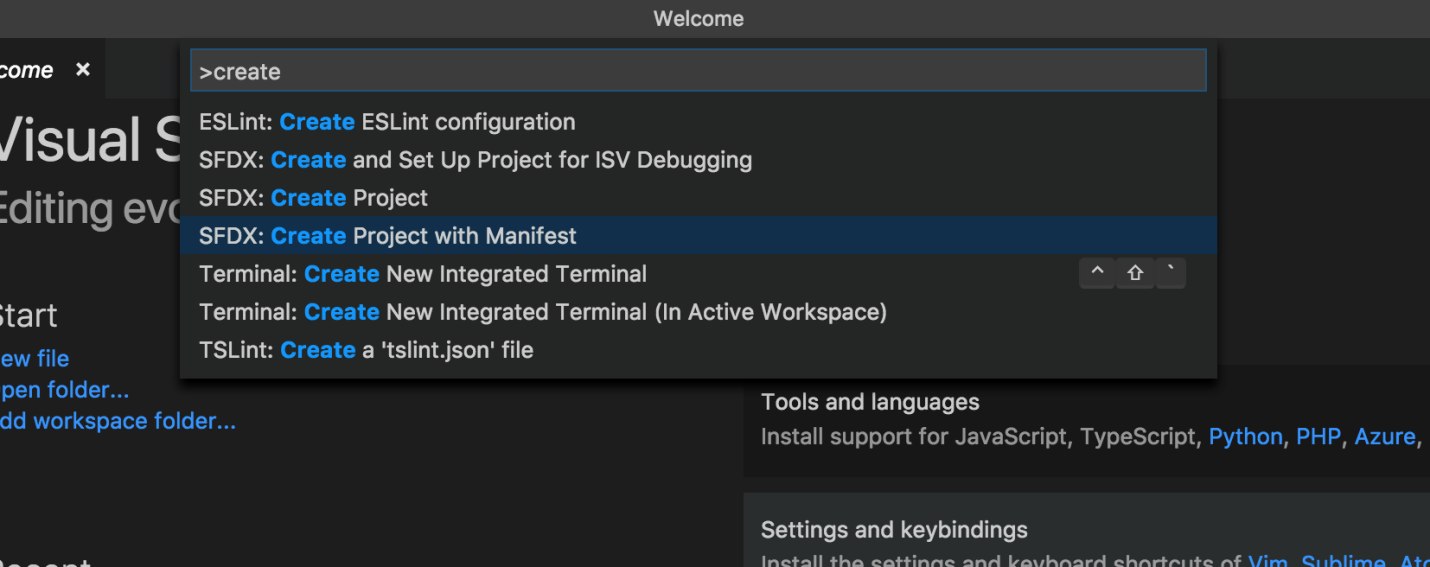
First, open VS Code and create a project. To create a project with a manifest, open the command palette (press Ctrl+Shift+P on Windows or Linux, or Cmd+Shift+P on macOS) and run SFDX: Create Project with Manifest.

Next, authorize the org you want to develop against. To start the login process, open the command palette and run SFDX: Authorize an Org.

After you select a login URL and give your project a name, your browser opens and you can log in to your org. After you finish logging in, close the browser and return to VS Code.
Deploy Source
After you make code changes, deploy these changes to your org.

To deploy source to an org without source tracking (to an org that’s not a scratch org), you can:
- Right-click a manifest, in the Visual Studio Code explorer or the editor, then select SFDX: Deploy Source in Manifest to Org.
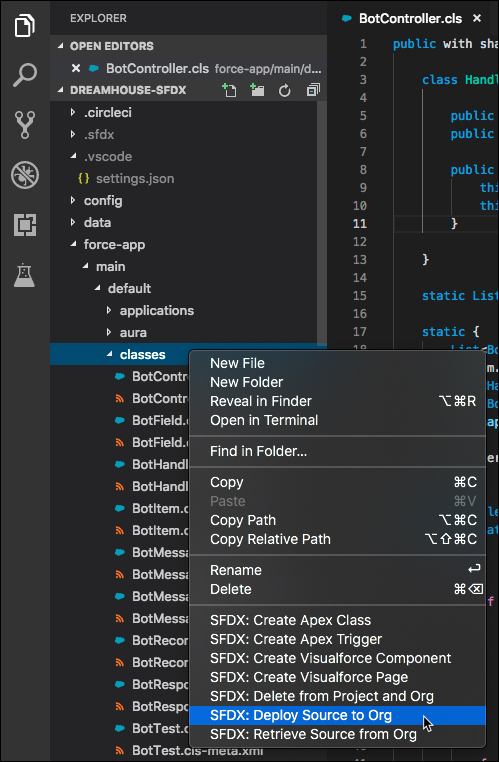
- In the Visual Studio Code explorer, right-click a source file or a directory. SelectSFDX: Deploy Source to Org.
- In a source file that’s open in the editor, right-click anywhere in the editing pane. Select SFDX: Deploy This Source File to Org.
- To deploy files each time you save them, set the user or workspace setting salesforcedx-vscode-core.push-or-deploy-on-save.enabled to true.


